PiCast: Retro Gaming Streaming with WebRTC
Introduction
So, you have a Raspberry Pi 4 sitting around collecting dust, but you don’t have a micro HDMI to HDMI cable? Same. That’s literally how PiCast was born - I had a Pi 4 I didn’t know what to do with, and instead of buying a cable, I decided to build a ridiculously cool retro gaming streaming solution that turns it into a cloud gaming console that looks like it came straight out of the 90s.
PiCast uses WebRTC for ultra-low latency streaming (we’re talking 50-150ms here), and the best part? It looks like an actual CRT TV. We’re talking scanlines, screen curvature, and that warm glow that makes you feel like you’re 10 years old again. All because I was too lazy to buy a cable.
Check it out on GitHub: hartyporpoise/picast
What Makes PiCast Special
Look, most game streaming solutions are obsessed with 4K this and 120fps that. But here’s the thing - retro games don’t need that. They need to feel right. PiCast is purpose-built for nostalgia:
- Ultra-low latency - WebRTC gives you 50-150ms latency, which is actually playable (unlike some streaming services I won’t name)
- Authentic CRT aesthetics - Scanlines, vignette, screen curvature, and subtle flicker that’ll make you tear up a little
- Hardware efficiency - Runs smooth on a Raspberry Pi 4 with less than 60% CPU usage (your Pi can finally do something cool)
- Zero configuration - Docker-based deployment that actually works (I know, shocking)
- Controller support - USB and wireless controllers that reconnect automatically when you unplug them (because we’ve all been there)
Architecture Overview
Alright, let’s get nerdy for a second. Here’s how the magic happens:
┌─────────────────────────────────────┐│ Raspberry Pi Container ││ ││ RetroArch → Xvfb → ffmpeg ││ ↓ ││ PulseAudio (1ms latency) ││ ↓ ││ aiortc (WebRTC) ││ ↓ ││ Flask + Socket.IO (Signaling) │└──────────────┬──────────────────────┘ │ HTTP + WebRTC │ ┌──────────▼──────────┐ │ Browser (Client) │ │ Retro CRT TV UI │ └─────────────────────┘The whole thing runs in a Docker container because, let’s be honest, who wants to deal with dependency hell? Here’s what’s doing the heavy lifting:
- Xvfb - Virtual display so RetroArch thinks it has a screen (it doesn’t, but don’t tell it)
- RetroArch - The emulator that handles basically every retro system (NES, SNES, Genesis, PS1, GB, GBA, N64 - you name it)
- PulseAudio - Virtual audio with 1ms latency because audio lag is the worst
- ffmpeg - Grabs frames directly from the virtual display (no copying, just pure efficiency)
- aiortc - Python WebRTC library that makes the streaming actually work
- Flask + Socket.IO - The web server and signaling that connects everything together
Quick Start
Let’s get this thing running! It’s actually pretty straightforward, I promise.
Prerequisites
On your Raspberry Pi:
- Raspberry Pi 3/4/5 (I’d recommend Pi 4 with 4GB+ RAM, but Pi 3 works too if you’re patient)
- Docker & Docker Compose (if you don’t have these, Google it - there are a million tutorials)
- Git (you probably have this already)
On your local machine (if you want to deploy remotely):
expect- Required for the deploy script (install withbrew install expecton Mac orapt-get install expecton Linux)
Installation
-
Clone or Deploy
You’ve got two options here:
Option A: Clone directly on your Pi (the simple way)
Terminal window git clone https://github.com/hartyporpoise/picast.gitcd picastOption B: Deploy from your local machine (the fancy way)
Terminal window This is handy if you don’t want to SSH into your Pi every time.
-
Setup (on Raspberry Pi)
Terminal window cd ~/picast./setup.shThis script does a few things: installs Xbox controller drivers (if you’re using the wireless adapter), creates the ROM directory, and sets up RetroArch with some sensible defaults. It’s basically magic.
-
Add Your ROMs
Now for the fun part - add your games! Just drop your ROM files into the
roms/directory. RetroArch is smart and figures out what system each game is for based on the file extension:roms/├── mario.nes # Nintendo Entertainment System├── mario.sfc # Super Nintendo├── sonic.gen # Sega Genesis├── pokemon.gba # Game Boy Advance├── pokemon.gb # Game Boy├── pokemon.gbc # Game Boy Color├── crash.bin # PlayStation 1└── zelda.z64 # Nintendo 64Or if you’re deploying remotely, you can use the deploy script to copy ROMs:
Terminal window -
Start PiCast
Terminal window docker-compose up -dThat’s it! The
-dflag runs it in the background. If you want to watch the logs (which is actually pretty satisfying), run:Terminal window docker-compose logs -f
Accessing PiCast
Alright, moment of truth! Open your browser and navigate to:
http://<raspberry-pi-ip>/Replace <raspberry-pi-ip> with your actual Pi’s IP address (you can find it with hostname -I on the Pi, or just check your router).
First Time Setup:
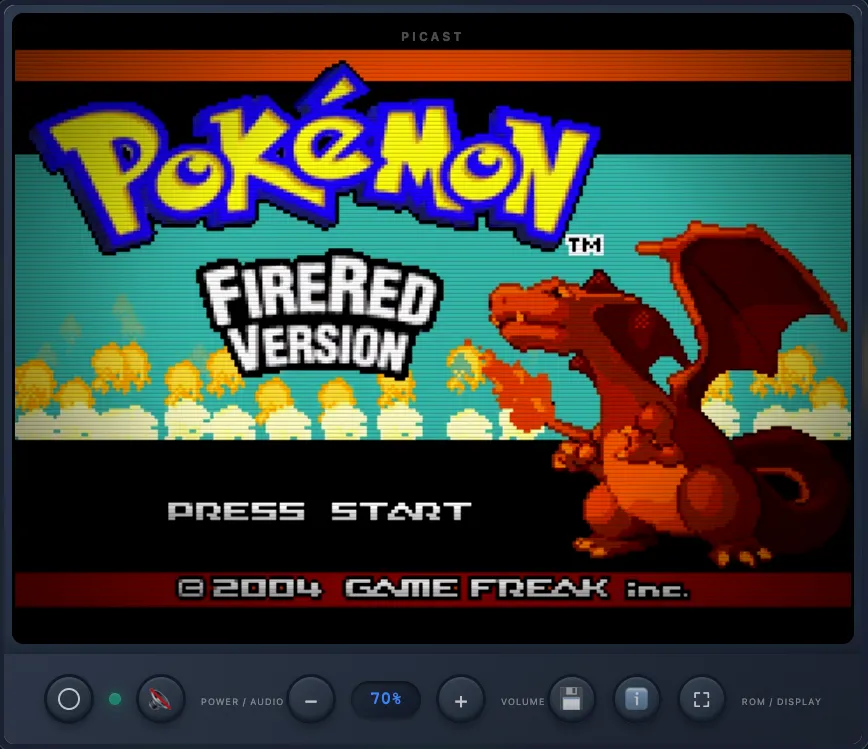
- Click the Power Button - this is where it gets good. Watch that authentic CRT turn-on effect (white flash, static, fade-in). It’s beautiful.
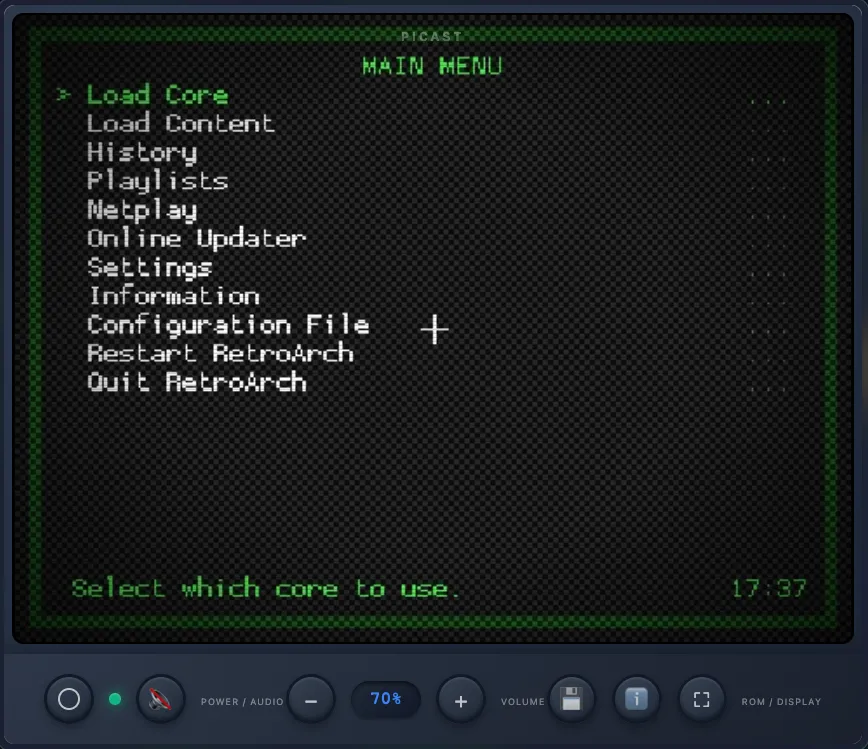
- Navigate the RetroArch menu to load a game (or just hit “Load Content” and pick something)
- Click the Audio Button to enable sound (you’ll want this, trust me)
- Adjust volume with + / - buttons if needed
Seriously, that power-on sequence never gets old. It’s the little things, you know?
Features Deep Dive
Now let’s talk about what makes this thing actually cool.
Retro CRT Interface
The interface is designed to make you feel like you’re sitting in front of a CRT TV from 1995. We’ve got:
- Scanlines - Those horizontal lines that make everything look authentic
- Screen Curvature - The edges bulge slightly, just like old TVs
- Vignette - Darker edges that fade to black (very cinematic)
- Color Adjustment - Boosted contrast, saturation, and brightness because retro games deserve it
- Subtle Flicker - A gentle opacity variation that adds realism (not annoying, I promise)
- CRT Glow - That inner screen glow that makes everything feel warm and fuzzy
All of this is done with CSS, which is both impressive and slightly concerning. But it works!
Power-On Sequence
Okay, this is my favorite part. When you click the power button, you get a full CRT turn-on sequence:
- White flash expands from the center (classic CRT effect)
- Static noise appears briefly (the good kind of static)
- Video fades in smoothly
- Status LED changes to green
It’s pure nostalgia, and I’m not ashamed to say I’ve clicked it multiple times just to watch it happen.
WebRTC Performance
WebRTC is what makes this actually playable. Here’s why it’s better than traditional streaming:
- Adaptive bitrate - It automatically adjusts based on your connection (no more buffering!)
- Low latency - 50-150ms end-to-end latency means you can actually play platformers without wanting to throw your controller
- Efficient encoding - Uses hardware acceleration when available (your Pi will thank you)
- Direct peer connection - Less server load, more efficiency, happier Pi
Want to see what’s happening under the hood? Click the stats button and check out the “Stats for Nerds” overlay:
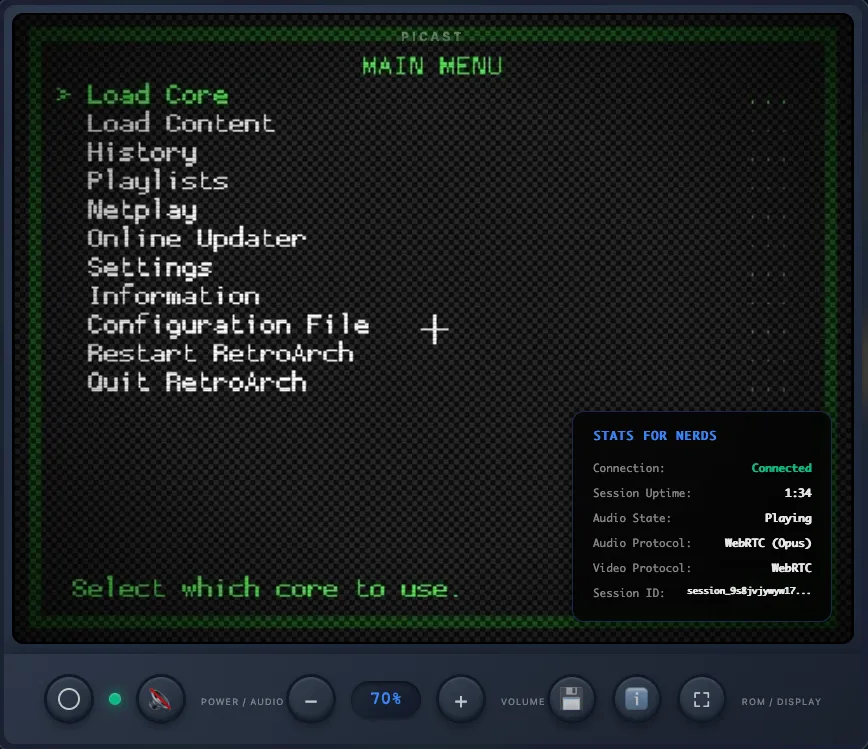
It shows you all the WebRTC connection info, latency, codec details - basically everything you need to geek out about.
Controller Support
Here’s something that actually works well: automatic USB controller hotplug support. You know how annoying it is when you unplug your controller and have to restart everything? Yeah, me too. That’s why PiCast automatically detects when a controller disconnects and reconnects, then restarts RetroArch to pick it up. No container restart needed!
The scripts/input-reconnect.sh monitor runs in the background and:
- Watches
/dev/inputfor USB input device reconnections - Detects when joystick devices (
js*) or USB devices appear - Automatically restarts RetroArch when a device reconnects
- Works with basically any USB controller/joystick (I’ve tested Xbox, PlayStation, and generic USB controllers)
It’s one of those features you don’t think about until you need it, and then you’re grateful it exists.
Configuration
Want to tweak things? Of course you do. Here’s how.
Docker Compose Environment Variables
Crack open docker-compose.yml and you can customize basically everything:
Video Settings:
VIDEO_SIZE- Resolution (default:640x480- 4:3 aspect ratio, perfect for retro games)FRAMERATE- Frames per second (default:24, which is plenty for retro games)DISPLAY_RESOLUTION- Virtual display resolution (default:640x480x24)
General Settings:
LOG_LEVEL- Logging level (DEBUG, INFO, WARN, ERROR - DEBUG is fun if you want to see everything)AUTO_START_RETROARCH- Auto-launch RetroArch on startup (default:true, because who wants to manually start it?)ENABLE_VNC- Enable VNC access (uses more CPU, default:false- only enable if you really need it)
Performance Tuning
Got a Pi 3 or running other stuff? Lower the settings:
environment: - VIDEO_SIZE=512x384 - FRAMERATE=20Got a Pi 4 with nothing else running? Crank it up:
environment: - VIDEO_SIZE=800x600 - FRAMERATE=25My recommended settings (the sweet spot):
- Resolution: 640x480 (4:3 - perfect for retro games, not too demanding)
- Framerate: 24 FPS (default) or 20 FPS if your Pi is struggling
- CPU Usage: ~40-50% on Pi 4 (leaves plenty of headroom for other stuff)
Honestly, the defaults are pretty good. I’d only change them if you’re having performance issues or want to experiment.
API Endpoints
For the API nerds out there (you know who you are), PiCast exposes a few endpoints:
GET /- The main HTML player with the retro CRT TV interface (this is what you’ll use 99% of the time)GET /health- Health check endpoint for monitoring (useful if you’re running this in production)GET /info- Server information and statistics (fun to check if you’re curious)
The /info endpoint is pretty useful - it tells you what’s going on:
{ "service": "PiCast", "version": "2.0.0", "uptime_seconds": 3600, "active_connections": 1, "configuration": { "video_size": "640x480", "framerate": 24 }}Most people won’t need these, but they’re there if you want to integrate PiCast into your monitoring setup or build something cool on top of it.
Troubleshooting
Things not working? Let’s fix it.
No Audio
This is the most common issue, and it’s usually simple:
- Click the 🔊 Audio button - seriously, you have to click it to connect WebRTC audio (I forget this all the time)
- Check your browser console for errors (F12, then look at the Console tab)
- Verify PulseAudio is working:
docker exec picast pactl list sinks short - Check the logs:
docker-compose logs | grep -i audio
Most of the time it’s just forgetting to click the audio button. We’ve all been there.
Poor Performance / High CPU
If your Pi is struggling:
- Lower the resolution:
VIDEO_SIZE=512x384(in docker-compose.yml) - Reduce framerate:
FRAMERATE=15(retro games don’t need 60fps anyway) - Make sure VNC is disabled:
ENABLE_VNC=false(it uses extra CPU) - WebRTC automatically optimizes encoding based on your connection, so it should adapt, but lower settings help
If you’re still having issues, maybe don’t run 10 other containers at the same time? Just a thought.
Controller Not Working
Controllers being difficult? Try this:
- Check that device passthrough is working -
docker-compose.ymlshould include/dev/input - Test your controller:
docker exec picast jstest /dev/input/js0(replacejs0with your device) - For Xbox wireless adapter, run
setup.shagain (sometimes it needs a refresh) - Remember that controllers auto-reconnect - no need to restart the container!
The hotplug support should handle reconnections automatically, but if it’s not working, check the logs: docker exec picast tail -f /tmp/input-reconnect.log
Use Cases
So when would you actually use this? Here are some ideas:
- Remote retro gaming - Play your favorite retro games from anywhere (coffee shop, work, your friend’s house - wherever)
- Multiplayer sessions - Share the experience with friends (one player at a time, but hey, it’s retro gaming)
- Game preservation - Stream your ROM collection without exposing the actual files (security through obscurity, or something)
- Low-power gaming - Run on a Raspberry Pi without needing a gaming PC (your electricity bill will thank you)
- Nostalgic experience - The CRT effects bring back that authentic retro feel (prepare to feel old)
Honestly, I mostly built it because I thought it would be cool. But it’s actually useful too, which is a nice bonus.
Technical Highlights
Okay, time to get technical. Here’s what’s happening under the hood.
RetroArch Optimizations
I spent way too much time tweaking RetroArch settings. Here’s what I came up with:
video_threaded = true- Threaded rendering because single-threaded is for chumpsaudio_latency = 128- Lower CPU usage with acceptable latency (128ms is fine for retro games)menu_driver = "rgui"- Lightweight UI that doesn’t eat your CPUvideo_vsync = false- No vsync overhead (we’re streaming anyway, so who cares?)
These settings make RetroArch run smoothly on a Pi without sacrificing too much. It’s a delicate balance.
WebRTC Implementation
The WebRTC stuff is where the magic happens:
- aiortc - Python WebRTC library (because Python is life)
- Socket.IO - Signaling for peer connection establishment (handles the handshake)
- PulseAudio - Ultra-low latency audio with 1ms fragments (because audio lag is the worst)
- ffmpeg x11grab - Raw frame capture directly from the virtual display (no copying, just efficiency)
The whole thing is surprisingly efficient. WebRTC handles adaptive bitrate automatically, so it adjusts based on your connection. It’s pretty cool.
Docker Architecture
The container is basically a whole operating system in a box:
- Xvfb virtual display (so RetroArch thinks it has a screen)
- Openbox window manager (lightweight, does the job)
- RetroArch emulator (the star of the show)
- PulseAudio virtual audio (for that sweet, sweet audio)
- Flask web server (serves the HTML and handles API calls)
- WebRTC peer connections (the streaming magic)
All orchestrated through docker-compose with proper volume mounts for ROMs, saves, and controller access. It’s a lot of moving parts, but Docker makes it manageable.
Conclusion
Look, you don’t need expensive cloud gaming services to stream games. With a Raspberry Pi, Docker, and some clever engineering (and probably too much coffee), you can create a retro gaming streaming solution that actually works - and looks amazing while doing it.
The combination of WebRTC for low latency, RetroArch for emulation, and a carefully crafted UI creates an experience that’s both nostalgic and modern. Whether you’re looking to play retro games remotely, want a fun self-hosting project, or just think CRT TVs are cool (they are), PiCast delivers.
It’s not perfect - nothing is - but it’s pretty damn good. And honestly, watching that power-on sequence never gets old. Give it a try and let me know what you think!
Check out the repository on GitHub if you want to contribute, report issues, or just see how it all works under the hood.